
rolanstar computer desk assembly instructions pdf
Rolanstar Computer Desk Assembly: A Comprehensive Guide
Accessing the Rolanstar desk’s PDF manual is crucial; find resources on the official website or explore third-party repositories for detailed assembly instructions.
Unboxing and Inventory
Carefully unpack all components from the Rolanstar desk packaging, referencing the parts list within the PDF manual to ensure everything is present. Immediately verify all listed items – desk frame sections, legs, the motor mechanism (if applicable), control panel, screws, bolts, and any included tools – are accounted for.
Compare the physical components against the exploded view diagram in the manual. Note any discrepancies or missing parts before beginning assembly. Retain the packaging material for potential returns or warranty claims. A thorough inventory now prevents frustrating delays later. The PDF manual often details specific part numbers for easy identification and potential replacement requests if needed.
Identifying Desk Components
The Rolanstar desk’s PDF manual provides detailed diagrams illustrating each component. Familiarize yourself with the desk frame sections – typically consisting of crossbars and support beams. Identify the desk legs, noting any differences between them (some may be specifically designated for left or right sides).
Locate the motor mechanism (if your desk is height-adjustable) and the control panel. Distinguish between various screw and bolt sizes, as the manual will specify their usage for different assembly stages. Pay close attention to the mitre gears, crucial for height adjustment, as replacements can be challenging to source. The manual’s exploded view is invaluable for visual identification.
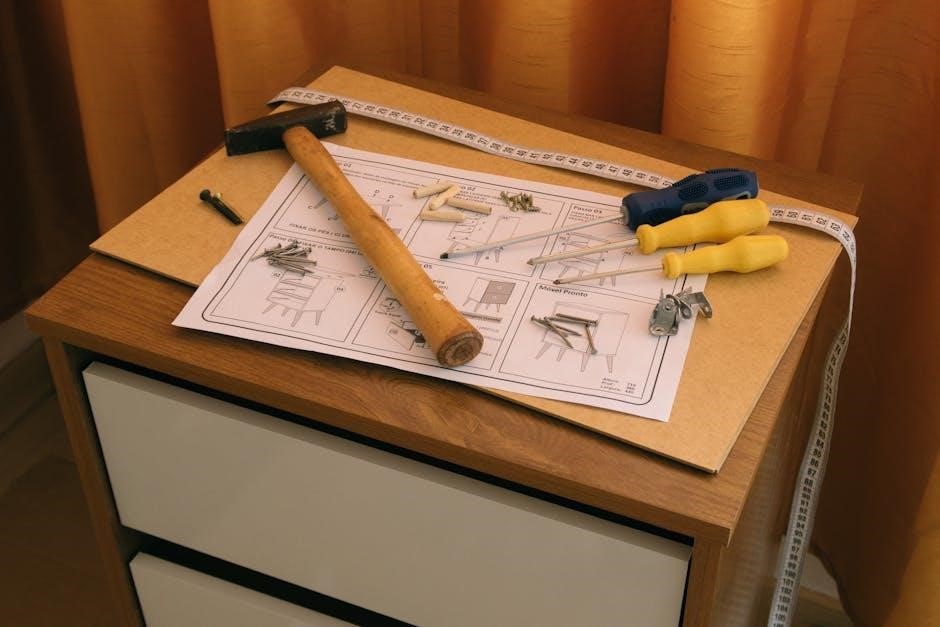
Tools Required for Assembly
The Rolanstar desk’s PDF manual outlines essential tools for a smooth assembly. A Phillips head screwdriver is fundamental, with both standard and magnetic options recommended. An Allen wrench set, often included, is vital for tightening specific bolts. A rubber mallet can assist with gently securing components without causing damage.
Consider having a power drill with various bits for faster screw insertion, but use caution to avoid over-tightening. A level is crucial for ensuring a stable desk surface. Measuring tape aids in verifying component alignment. Finally, having a soft cloth on hand protects the desk’s finish during assembly.

Step-by-Step Assembly Instructions
Follow the Rolanstar PDF manual’s detailed diagrams and instructions carefully, beginning with the frame and legs, then the motor and control panel.
Attaching the Desk Frame
Begin by carefully laying out all frame components, referencing the Rolanstar PDF manual’s exploded view diagram. Align the side panels with the crossbar, ensuring correct orientation as indicated in the manual. Securely attach these pieces using the provided screws – do not overtighten initially.
Next, connect the rear panel to the assembled side and crossbar structure, again using the specified screws. Double-check alignment before fully tightening all fasteners. A stable frame is foundational; ensure all connections are snug and square. Refer to the manual’s illustrations for precise screw placement and torque recommendations. This initial frame assembly forms the desk’s core structure, so precision is key for subsequent steps.
Installing the Desk Legs
Consult the Rolanstar desk’s PDF manual for leg attachment specifics, as designs vary between models. Typically, legs attach to the underside of the assembled frame using bolts and washers. Ensure proper leg orientation – some legs may be designated for specific corners.
Carefully align each leg with the pre-drilled holes on the frame and insert the bolts, tightening them gradually in a crisscross pattern. This ensures even pressure distribution and prevents wobbling. Do not fully tighten until all legs are attached. Once all legs are in place, firmly tighten all bolts, verifying stability. Refer to the manual for torque specifications to avoid stripping the threads.
Assembling the Motor Mechanism (If Applicable)
If your Rolanstar desk is height-adjustable, the PDF manual will detail motor mechanism assembly. This usually involves attaching the motor housing to the desk frame, often with screws and brackets. Carefully connect the motor to the lifting columns, ensuring proper alignment as indicated in the manual’s diagrams.
Pay close attention to cable routing, avoiding pinching or strain. Connect any intermediate connecting rods or gears as shown. Secure all connections tightly, but avoid over-tightening. The manual will specify the correct orientation and attachment points for each component. Double-check all connections before proceeding to the next step, referencing the PDF for clarity.
Connecting the Control Panel
The Rolanstar desk’s PDF manual provides specific instructions for control panel connection. Typically, this involves locating the designated port on the motor control box and carefully plugging in the control panel cable. Ensure the connector is fully seated and securely fastened. Some models may require mounting the control panel to the desk surface using screws.
Refer to the manual’s diagrams for the correct orientation and placement of the control panel. Avoid forcing the connection; if resistance is felt, double-check the alignment. Once connected, the control panel should power on, displaying the height adjustment functions. Test the up and down movements to confirm proper operation, consulting the PDF if issues arise.

Height Adjustment System
The Rolanstar desk’s PDF manual details control panel functions, initial calibration steps, troubleshooting, and recalibration procedures after disassembly for optimal height adjustments.
Understanding the Control Panel Functions
The Rolanstar height adjustable desk’s control panel, as detailed in the PDF manual, typically features up and down buttons for precise height adjustments. Memory presets allow users to save preferred heights for quick access, enhancing ergonomic comfort. Digital displays clearly indicate the current desk height.
Important functions often include a safety lock feature to prevent accidental adjustments and a collision detection system that stops movement upon encountering resistance. The manual provides specific instructions on programming memory settings and interpreting any error codes displayed. Familiarizing yourself with these functions ensures smooth and safe operation of your desk’s height adjustment system, maximizing its benefits.
Initial Height Calibration
The Rolanstar desk’s PDF manual emphasizes initial height calibration for optimal performance. After assembly, and before saving presets, perform a full range test – raise and lower the desk completely. This process teaches the control box the desk’s limits.
If the desk doesn’t reach its lowest or highest point, a recalibration is necessary, often involving holding specific buttons simultaneously as outlined in the manual. Correct calibration ensures accurate height readings and prevents the desk from exceeding its physical boundaries. Proper calibration is vital for the collision detection system to function correctly, safeguarding against damage.
Troubleshooting Height Adjustment Issues
The Rolanstar desk’s PDF manual addresses common height adjustment problems. If the desk fails to move, first check the power connection and ensure the control panel is receiving power. A common issue involves accidental activation of the reset function, requiring recalibration as detailed previously.
For unresponsive controls, consult the manual’s troubleshooting section regarding potential error codes displayed on the panel. Notably, a user reported broken mitre gears causing functionality loss, necessitating repair or replacement – parts availability may be limited. Always disconnect power before attempting any internal repairs or inspections.
Recalibrating Height After Disassembly
The Rolanstar desk’s PDF manual outlines the recalibration process following disassembly. After reassembly, particularly after gear repairs (like the reported mitre gear issues), a height reset is essential. Typically, this involves holding specific buttons on the control panel – consult the manual for the exact sequence.
Ensure the desk is at the desired minimum height before initiating the reset. The manual details how to teach the desk its new height limits, preventing overextension or collision. If recalibration fails, double-check all connections and power supply, referencing the troubleshooting section for further guidance.

Power Features (If Applicable)
The Rolanstar desk’s PDF manual details power outlet and USB port functionality, alongside crucial safety precautions for all electrical components.
Connecting the Power Outlet
Refer to the Rolanstar desk’s PDF manual for specific instructions regarding the power outlet connection. Typically, this involves locating the power supply unit, often housed beneath the desk surface, and connecting the provided power cord. Ensure the power cord is securely plugged into both the desk’s power supply and a grounded electrical outlet.
The manual will emphasize the importance of verifying voltage compatibility before plugging in the desk. Always use a surge protector to safeguard the electrical components from potential power fluctuations. Pay close attention to any warnings within the manual concerning proper grounding procedures to prevent electrical hazards. Incorrect connection can lead to malfunction or damage, so meticulous adherence to the PDF instructions is vital.
USB Port Functionality
The Rolanstar desk’s PDF manual details the USB port functionality, typically offering both USB-A and USB-C ports for convenient device charging and data transfer. Consult the manual to understand the amperage output of each port, as this impacts charging speed for various devices. It will also specify if the ports support USB Power Delivery (USB-PD) for faster charging of compatible laptops and tablets.
Troubleshooting tips within the manual address common issues like ports not recognizing devices. Ensure devices are properly connected and compatible with the USB standard. The manual may also advise checking the power supply connection if USB ports are unresponsive. Proper utilization enhances the desk’s functionality, streamlining your workspace.
Safety Precautions for Electrical Components
The Rolanstar desk’s PDF manual emphasizes crucial safety precautions regarding electrical components. Always ensure the power outlet is properly grounded and matches the desk’s voltage requirements to prevent electrical shock. Never operate the desk with a damaged power cord; replace it immediately. Avoid exposing electrical parts to moisture or liquids.
The manual warns against overloading the power outlet or USB ports, which could cause overheating and potential fire hazards. Disconnect the desk from the power source before cleaning or performing any maintenance. Do not attempt to disassemble or repair electrical components yourself; contact qualified personnel. Prioritizing these precautions ensures safe operation.

Common Assembly Problems & Solutions
The PDF manual details solutions for missing parts, stripped screws, and misaligned holes; contacting Rolanstar is advised for replacements or assistance.
Missing Parts – Contacting Rolanstar
If you discover missing components during assembly, referencing the parts list within the Rolanstar desk’s PDF manual is the first step. Carefully cross-reference the included hardware with the diagram to confirm the shortage. Unfortunately, reports indicate Rolanstar may discontinue support for older models, potentially limiting replacement part availability.
Despite this, attempting to contact Rolanstar customer service via their official website remains advisable. Be prepared to provide your order number, desk model (CPT007), and a detailed description of the missing part(s). Documenting the issue with photos can expedite the process. However, be aware that some users have experienced difficulty obtaining replacements, as the product line may be offline.
Stripped Screws and Damaged Components
Encountering stripped screws or damaged components during Rolanstar desk assembly is frustrating. The PDF manual doesn’t explicitly address this, so caution is key during tightening. Avoid over-torquing screws, as the MDF material is susceptible to damage. If a screw strips, attempt using a rubber band or steel wool for added grip.
For more significant damage, particularly to the motor mechanism or mitre gears (as reported by users), obtaining replacements directly from Rolanstar may prove difficult due to potential product line discontinuation. Consider DIY repair options, like fabricating gears from spare parts, but proceed with caution. Thoroughly review the assembly instructions PDF for correct component orientation.
Addressing Misaligned Holes
Misaligned holes are a common issue during Rolanstar desk assembly, often not detailed in the PDF manual. Don’t force screws; this can strip threads or damage the desk’s structure. Gently apply pressure while attempting to align the holes, and slightly loosen adjacent screws to allow for minor adjustments.
If misalignment persists, double-check component orientation against the exploded view in the PDF; Sometimes, parts are installed backward. Users have reported disassembling sections to reset alignment, particularly with the frame. Ensure a level surface during assembly to prevent skewed alignments. Careful review of the manual’s diagrams is essential.

Gear Mechanism Issues & Repair
Broken mitre gears, a frequent problem, aren’t fully covered in the Rolanstar PDF; DIY repair or sourcing spares may be necessary for functionality.
Identifying Broken Mitre Gears
Determining if mitre gears are the source of your height adjustment issue requires careful inspection. The Rolanstar PDF manual offers limited detail on this specific component, making diagnosis trickier. Typically, a failure manifests as the desk failing to move, or exhibiting grinding noises during operation.
Visually, look for cracked, chipped, or completely broken teeth on the gears; These gears are located within the motor mechanism housing, often requiring partial disassembly to access. A common failure point is the plastic material itself becoming brittle and fracturing under stress. Online forums suggest this is a recurring issue with Rolanstar desks, highlighting the need for durable replacements. The PDF doesn’t provide detailed diagrams for gear identification, so referencing online resources may be necessary.
Sourcing Replacement Gears (Challenges)
Finding replacement mitre gears for the Rolanstar desk presents significant hurdles. The official Rolanstar support, as reported by users, has discontinued parts availability for many models, rendering direct sourcing impossible. The PDF manual doesn’t list part numbers for individual components, further complicating the search.
Generic gear replacements may seem viable, but matching the precise tooth count, pitch, and material is critical for proper function. Online marketplaces like eBay or AliExpress might offer compatible gears, but verifying specifications is essential. DIY solutions, involving 3D printing or machining replacements, are gaining popularity, but require specialized skills and equipment. The lack of official support emphasizes the need for proactive preventative maintenance.
DIY Gear Repair/Replacement Options
Given the scarcity of official replacement parts, resourceful owners are turning to DIY solutions. One successful approach, detailed in online forums, involves machining new gears from brass stock, offering increased durability compared to the original plastic components. 3D printing presents another avenue, though material selection is crucial for strength and longevity.
Careful disassembly, guided by the Rolanstar desk assembly instructions PDF, is paramount. Accurate measurements of the broken gears are needed to replicate the tooth profile. Utilizing online CAD software and printing services can facilitate gear creation. Remember to lubricate the new gears thoroughly upon installation to ensure smooth operation and prevent premature wear.

Desk Stability and Reinforcement
Refer to the Rolanstar desk assembly instructions PDF to ensure a level surface and reinforce stability by meticulously tightening all screws and bolts.
Ensuring a Level Desk Surface
Achieving a perfectly level desk surface is paramount for both comfort and stability. The Rolanstar desk assembly instructions PDF emphasizes checking the floor’s evenness before beginning. Utilize a spirit level placed across the desk’s surface in multiple directions – lengthwise, widthwise, and diagonally – to identify any imbalances.
If the floor is uneven, adjustable feet, often included with the desk, should be utilized; Carefully rotate these feet to raise or lower specific corners until the level indicates a perfectly horizontal plane. Consistent leveling prevents wobbling, reduces stress on the frame, and ensures the height adjustment mechanism functions smoothly. Refer to the PDF for specific foot adjustment details.
Tightening All Screws and Bolts
Consistent and thorough tightening of all screws and bolts is critical for long-term desk stability, as detailed in the Rolanstar desk assembly instructions PDF. After initial assembly, and periodically thereafter, systematically inspect every fastener. Use the appropriate tool – typically an Allen wrench or screwdriver – to ensure each is securely tightened, but avoid over-tightening, which can strip threads or damage components.
Pay particular attention to the frame connections, leg attachments, and motor mounting points (if applicable). A loose screw can lead to wobbling, noise, or even structural failure. The PDF often highlights key fasteners requiring extra attention. Regular checks and tightening maintain the desk’s integrity and prevent future issues.

Rolanstar Desk Material & Certification
Rolanstar utilizes metal frames and MDF boards, meeting EPA TSCA Title VI and Carb Certification standards, as outlined in the assembly PDF.
EPA TSCA Title VI Compliance
Rolanstar demonstrates a commitment to air quality by adhering to the Environmental Protection Agency’s (EPA) Toxic Substances Control Act (TSCA) Title VI regulations. This compliance signifies that the composite wood products used in the desk’s construction – specifically the MDF board – meet stringent formaldehyde emission standards.
These standards are crucial for minimizing indoor air pollution and ensuring a healthier environment for users. The assembly instructions PDF doesn’t explicitly detail testing procedures, but confirms the materials meet these legal requirements. Choosing a Rolanstar desk means selecting a product manufactured with responsible material sourcing and a focus on reducing potentially harmful emissions, as verified through certification processes.
Carb Certification Details
Rolanstar desks proudly hold California Air Resources Board (CARB) certification, a vital indicator of low formaldehyde emissions from composite wood products. This certification, often referenced within the assembly instructions PDF, assures customers that the MDF board used in the desk’s construction meets strict air quality standards.
CARB’s regulations are among the most rigorous globally, focusing on minimizing indoor air pollution. The certification process involves thorough testing and verification of formaldehyde levels. Selecting a CARB-certified Rolanstar desk demonstrates a commitment to health and environmental responsibility, providing peace of mind regarding the air quality in your workspace. This detail is a key aspect of product quality.

Finding the Rolanstar Desk PDF Manual
Locate the Rolanstar desk’s PDF manual through the official website or reliable third-party repositories for comprehensive assembly instructions and product details.
Official Rolanstar Website Resources
Navigating the official Rolanstar website is the primary method for obtaining the computer desk assembly instructions PDF. Typically, a dedicated “Support” or “Downloads” section houses these crucial documents. Users should search using the desk’s model number – often found on the original packaging or a sticker underneath the desk itself – to pinpoint the correct manual.
Rolanstar frequently provides multiple versions of the PDF, potentially including updated revisions addressing common assembly issues or clarifying steps. Direct links to manuals may also be embedded within product pages. If a direct download isn’t immediately visible, utilizing the website’s search function with keywords like “assembly manual” or “instruction PDF” is recommended.
Remember to check the FAQ section, as it may contain answers to frequently asked questions regarding assembly, potentially eliminating the need to download the full manual for simple issues.
Third-Party Manual Repositories
When the official Rolanstar website proves unhelpful, several third-party manual repositories can be valuable resources for locating the computer desk assembly instructions PDF. Websites specializing in user manuals, like ManualsLib or similar platforms, often host documents uploaded by customers. Searching using the desk’s model number is again essential for accurate results;
However, exercise caution when downloading from these sources; verify the file’s legitimacy and scan for potential malware before opening. Online forums and communities dedicated to furniture assembly may also contain shared links to PDFs or offer assistance in locating the correct manual.
Be aware that manuals found on third-party sites may not always be the latest version, so cross-referencing with any available information from Rolanstar is advisable.